Tuesday, March 31, 2009

Darkness at Hope Cross Outdoor Map

Here's one more item for the adventure:


Thursday, March 26, 2009

Update

Well, I've added the village map - but now I need to update the building descriptions to conform with what I've drawn (man, what a process that was, too - hand drawn, scanned, printed, redrawn in ink, rescanned - made blue, numbered, bleah...).

Anyway, I have a cover in the works and I'll have extra map pages to fill with some more encoutner areas unless I do a tri-fold cover. Still have to get the outdoor map together.

So - probably need to come up with a map for Seeley's Glen and maybe one or two other smaller areas. Hag Island is too big to include in this adventure... Maybe the druid's grove, and give the druid a greater role in the potential adventure...

Darkness at Hope Cross Village Map


Here's a copy of the Village Map in pseudo Old School Blue:


Saturday, March 21, 2009

Daen-Ral

My original world is Daen-Ral (well, that's the name of the main continent, anyway). I was thinking, rules-wise, a couple things that make Daen-Ral unique.

First, of course, is geography and politics (not rules-based, but unique). More on that later.

Second: Cosmology. There are hundreds of gods in Daen-Ral (nothing new there) and they all exist either on the Prime Material Plane or on some other plane - but they are not really gods. They're the equivalent of very powerful demons and devils. And there really aren't very many planes. There is the prime, of course, and then there are the five elemental planes (air, earth, fire, water, void/darkness) and the abyss & hell, the grey plane (kind of the astral/ethereal/purgatory), paradaise. I think that's about it. I'll have to unpack that more, of course, but that's really the cosmology.

The reasons for this adjusted cosmology is that I'm taking a more monotheistic approach to worldbuilding. There is one creator God. The story is that there was a rebellion in heaven when the Creator fashioned human beings and gave them the choice to serve God or serve their own desires. The fallen angels wreaked havoc on creation and a spiritual war has been going on ever since.

The fallen are called to repent. Immediately some did. The Creator gave those angels the task to be guardians of creation (Daen-Ral) and gave them human-like forms (elves and dwarves - the Exiles and the Dwarvanna, respectively) and charged them with guardianship of the world. They were settled on the continent opposite that populated by human beings (Baroth). They acted as secret guardians of the world. Slowly, humanity began exploring the world at large and discovered the continent on which the Exiles and Dwarvanna dwelt (Daen-Ral). The guardians of the world had, over the centuries, forgotten their purpose and even forgotten much of their worship of the Creator God. Some re-allied themselves with the Firstfallen angels - major demonic and diabolic creatures who became as gods to the world.

There's more to the history of the world, of course, but that is a taste of the difference in cosmology.

Third, Ecology. On Daen-Ral, there are creatures, there are monsters and there are supernatural beings.

Creatures are natural animals, people, etc (generally, human beings and many creatures with animal intelligence).

Monsters are fabricated of magic, elements and evil - goblins, orcs, shambling mounds, beholders, etc. fall in this category. Pretty much any creature can appear in Daen-Ral, without "ecology" considerations, since monsters don't have to eat, sleep, procreate, etc. They are raw elemental evil monstrosities. And, while they don't have to eat or procreate, they sometimes choose to (for any of a variety of twisted reasons). Thus, there are some half human- half monstrous beings in the world. Consequently, there are no baby orcs, no female goblins, no Beholder young that could be considered "innocent". Every monster encountered was fabricated by magic to spread chaos and violence.

Supernatural beings are elves, dwarves, faerie, dragons, and a number of other "monsters" that have gained a certain amount of...mortality. For example, the first of the elves are completely immortal - yet they began to breed with human beings (thus the Firstborn) and then intebreed among the firstborn...each generation following living shorter lives (though the Firstborn are nearly immortal, living tens of thousands of years) - thus, many elves & dwarves have actually become creatures (with special abilities) and all have some human "taint"though most don't know it. Dragons, too, are among the Firstfallen, the Exiles. All supernatural beings have a preferred shape, though all can shapechange.

I will at some point try to codify all the creatures/monsters/beings of Daen-Ral in some kind of a tome (I'm trying to find a free pdf editor - good luck, I know - so I can put together the various monster pdfs that I have into a Daen-Ral book - I know foxit is only a hundred bucks, but it's about 90 more than I have to spend on rpg stuff.

Sunday, March 15, 2009

Update

I changed some of the settings on the blog because the white letters on black were making my eyes buggy... If I can find a template that I like, I'll probably go with that. But for now, I like what I have.

I'm editing the evil elemental gods - and now I'm at a crossroad with this project (yet another) - how much detail on origin? The gods are just super powerful demons, does it matter? I'm probably going to end up with a radically different cosmology than "standard" AD&D anyway. But how much explaining of Firstfallen and Firstborn and Twicefallen do I really want to deal with?

I've posted maps for Hope Cross - the village and regional maps are coming along - should have it all packaged and ready for artwork...of which I have none...by the end of the week.

I pulled my file for Eversnow Mountain and Whitestone Hall and Torgoth's River Canyon (which is little more than a sketch).

I've updated the Stuff I Want to Get Done post.

Saturday, March 14, 2009

The Elements

Okay - turns out I might have more to say about world building stuff and classes and the like than I thought I would. Oh well...

So it turns out that I've got a more Japanese take on the elements than traditional AD&D - that is, five basic elements (air, earth, fire, water, void - or darkness). In what I'm doing, Darkness is the first primordial element - darkness and chaos. From darkness come the four traditional elements - and hence the elemental gods of evil (which I'll detail later - but are loosely based on the Cthulhu mythos).

Now I have to figure out how these elements interact - since they aren't likely to directly counter one another - maybe. So I need to work out the interrelationships among the various elements - and do I want to have quasi or demi or para elements (you know - dust - between earth and air, magma - between earth and fire, mud - between earth and water and ....what happens when earth and darkness combine?)

Okay - so maybe it's the four traditional elements radiating out from Darkness at the center - and since darkness touches all of them, evil touches all of them...

Earth/Air - Dust


Earth/Fire - Magma


Earth/Water - Mud


Air/Fire - Ash


Air/Water - Vapor


Air/Earth - Dust


Water/Air - Vapor


Water/Earth - Mud


Water/Fire - Steam


So, I've got the interrelationships between the elements nailed (sort of).

Friday, March 13, 2009

Knights of the Elements

Elemental Avatars
The Knights of the Elements

FREQUENCY: Unique
NO. APPEARING: 1
ARMOUR CLASS: -3
MOVE: 12"
HIT DICE: 14
% IN LAIR: Nil
TREASURE TYPE: Nil
NO. OF ATTACKS: 2
DAMAGEIATTACK: 1-12/1-12
SPECIAL ATTACKS: Spells
SPECIAL DEFENCES: immune to charm, hold
MAGIC RESISTANCE: 75%
INTELLIGENCE: Genius
ALIGNMENT: CE
SIZE: M
PSlONlC ABILITY: Nil
Attack/Defence Modes: Nil
LEVEL/X.P. VALUE:

Though the five elemental evil gods are imprisoned and sleep in eternal slumber, a tiny bit of their essence is still tied to this plane of reality. Each of the Knights appears as an 8 ft tall humanoid in full black platemail wielding a greatsword. The platemail, while black, glows softly with a differernt color based on the element the avatar represents.
Fire - Red
Water - Blue
Earth - Brown
Air - White
Darkness - no glow - gloss black
Elemental Knights

Darkness At Hope Cross Dungeon Maps

Some pseudo-old school blue maps for the dungeon in the adventure. I'm working on the village map and the outdoor map. Artwork would be great but I'm a terrible artist (check out the sketches in one of the first posts below) and I'm cheap/poor. Well, I'll just keep plugging along...


Thursday, March 12, 2009

Update

Updated Dragonhall which finishes level one - though I'm going to tweak the goblin areas a bit. Way too underpowered considering what level this area is going to be intended for (though maybe the party would get overconfident if the goblins are a pushover - I don't think the fire giants and red dragon(s) will be...).

Also, I've had this idea for a wierd minor artifact ever since my daughter's got Rubik's Cubes as gifts last year: The Cube of Wonder

Darkness at Hope Cross Part 3

Well, here's the rest of DaHC - sans maps - I'll try to work on those soon and put this together into a pdf...

E. The Temple of Darkness

E1. The sheep carcass
This crevice in the rock was hidden by a large boulder previous to the great storm that swept through the area. The stream shifted the stone enough that when Adam Shepherd’s sheep fell into the stream, it was swept into this cave. It was the sheep’s cries that drew Adam to this cave where he found a handful of sealed clay pots in which were scrolls of an ancient language. (Note: There are few experts in the language - over 1000 years out of use - so getting a translation could prove difficult for the PCs). Thinking he might find real treasure deeper in the cave, he left the ewe behind and explored the caves. There are 8 pots with scrolls in them. The scrolls are religious texts dealing with a pantheon of 13 gods – air, water, stone, fire, love, hate, darkness, fate, chance, life, death, chaos, and order. These are old gods, elemental powers, really, worshipped ages ago by the people of the area.

E2. Steps up into the darkness
At the back of the cave there is a 3’ high opening about 8’ above the floor. That opening rises in steps to area 3.

E3. Poison Pool
This cave contains another dozen clay pots with scrolls in them as in area 1 above. In an alcove in the western wall is a pool of water. Steps have been carved into the rock leading down to the edge of the pool. Two human skeletons lie half submerged in the pool. One has a gold medallion (100gp value) depicting the symbol of darkness. The water here is poisoned by some liquid mercury(quicksilver) that polluted the water here. The water poisoned all of the followers of the god of darkness in this temple. The level of mercury in the water is such that it would take years for someone to die of exposure and downstream, where the underground stream meets seven stone creek, the mercury content is sufficiently diluted to not be a threat to anyone downstream.

E4. Smooth Stones
Hand and foot holds have been cut in the rock here, climbing 50’ up a natural stone chimney. Decades of use have worn the stones smooth.

E5. Frescoes of the Old Gods
This natural cavern gives way to worked stone. The walls of the east end of this space are covered in mosaics depicting acts of the old gods – fate and chance battling; air, stone, fire and water creating the world; fire and water destroying human beings; etc. The images are primal and depict the old gods’ power over all creation and, especially, their dominance of humans, demi-humans and humanoids. The corridor ends in two sealed doors. They are cast iron and depict the gods again in various activities. These monstrosities are each 6’ wide, 10’ high and must be at least 18” thick (if they manage to destroy the doors or open them, they will discover that they are a sandwich of 2” thick cast iron, 6” thick oak timber, 2” thick iron straps, 6” thick oak timber, 2” thick cast iron). The doors are wizard locked (at 15th level) and barred from the inside.

Note that from this chamber on, the pull of the Avatar of Darkness (see 15 and New Monster) becomes strong. Characters will have to make will checks (save vs. Death Magic) every round or begin moving toward the Inner Darkness and the presence of the Avatar of Darkness.

E6. Secret Room
This small room was a secret guard chamber when the temple was active. The secret door here (normal chance to detect) is very narrow. Fully armored characters might have a chance to get stuck here. Full plate (80% chance), Scale mail (40% chance), Banded, Ring, Splint mail (20% chance).

This would only be an annoyance except that the Avatar of Darkness has summoned two shadows and posted them in this otherwise empty room.

SHADOW (2): AC 7; MV 120’; HD 3+3; hp 19,21; THAC0 16; #AT 1; D 2-5; SA Drain STR; SD +1 wpn to-hit, 90% Hide in Shadows; SZ M; Int Low; AL CE; XP 301, 309 (MM)


E7. High Priest’s Chambers/servant’s chamber
These chambers were the High Priest’s chambers. They were opulent, hundreds of years ago, now having fallen to the same decay that has claimed most of this complex. In the main room, seated on a huge bone throne is a corpse. When the full party is in the room, each must make a save vs. magic. Failure means the character is teleported to a random place (consult the following table). The corpse is actually a Crypt Thing, which will not reveal its identity unless attacked.

CRYPT THING: AC 3; MV 120’; HD 6; hp 31; THAC0 13; #AT 1; D 1-8; SA Teleportation; SD +1 wpn to-hit; SZ M; Int Very; AL N; XP 461. (FF)

%roll Teleport location
01-20 Room 3 (Poison Pool)
21-40 Room 5 (Frescoes of the Old Gods)
41-60 Room 8 (Sanctuary)
61-80 Room 11 (Common Room)
81-90 Room 14 (The Black Pool)
91-95 Room 14g (The Old One)
96-00 Room 15 (The Inner Darkness)

E8. Sanctuary
This room is under the effects of continual darkness (at 20th level). Since the room is completely dark, PCs will need some kind of magical method of seeing for feel their way around in the dark. Secret doors will be virtually undetectable in this darkness.

Thirteen statues form an arc in this room – each one is a representation of one of the Old Gods. They are, clockwise from the south east, air, water, love, fate, order, life, darkness, death, chaos, chance, hate, fire, and stone. All have been defaced, knocked over, broken, except the statue of Darkness. When the Avatar of Darkness possessed Adam Shepherd, he directed him to destroy the other gods before sending him out to “spread the darkness.”

In the center of the dais on the Eastern wall is an altar. The stone is stained dark and there is a channel cut into it to a drain hole in the floor. There is also a small (about 1’ in diameter) hole in the floor (down which the priests would throw the remains of the animal sacrifices of old) which leads to area 14, the chamber of the Old One.

Hiding in the darkness are three more shadows who will attack at first opportunity.

SHADOW (3): AC 7; MV 120’; HD 3+3; hp 16, 18, 24; THAC0 16; #AT 1; D 2-5; SA Drain STR; SD +1 wpn to-hit, 90% Hide in Shadows; SZ M; Int Low; AL CE; XP 289,297, 321. (MM)


E9. Hidden Sacristy/Sacrifice Room
This hidden room was used for the true sacrifices to the old gods. Humans, demi-humans and humanoids were routinely brought here, laid on a huge stone table (with channels cut in it draining to a small hole, as in the Sanctuary, draining into area 14) and their hearts were cut out. Frescoes on the wall reveal the ancient and disturbing rituals – which included cannibalism.

The room holds the remains of a number of ritual knives, bowls, and the like. In addition, there are 5 amulets hanging on the Eastern wall – each contains the symbol of darkness and is fashioned of silver (value is about 50 gp each). The leather thongs will disintegrate quickly with use. Also, about 8” down the sacrifice drain is a small diamond (worth 500 gp).

The very center of the room (indicated on the map by the dashed line) is dirt covered wood, very old and 95% likely to collapse under any weight. A character falling into the hidden room takes 1d6 damage from the fall. Disturbing the room at (even by walking on the wood) wakes the bats that live in the chamber. They burst out from under the wooden floor and swoop around the room for 2 rounds before leaving the chamber. The bats will not attack, though they will confuse spell casting, fly into torches, etc.

Bat (64): AC 8; MV 10’/240’; MC: B; HD ¼ ; hp 1; THAC0 20; #AT 1; D 1; SA Swarm; SZ S; Int Anim; AL N; XP 1. (MM2)

In this small chamber, previously accessed via a trap door and a wooden ladder (which has rotted away) is the remains of a bed and a small wooden cabinet. The cabinet is nearly buried in bat guano and contains 18 gp, 39 sp, and 8 potions. The cabinet is, however, in terrible disrepair. Unless the character takes some kind of precautions, he or she must make a Dex check (at -4 Dex or less on d20) or have the cabinet fall apart destroying 1-8 of the potions inside. In addition, the cabinet is infested with 16 Rot Grubs.

ROT GRUB (16): AC 9; MV 10’; HD ¼ ; hp 1; THAC0 -; #AT -; D -; SA Burrow (1-6 + 1-3 till death); SZ S; Int Non; AL N; XP - (MM)

The potions in the cabinet are:
1. Green Dragon Control
2. Fire Resistance
3. Frost Giant Strength
4. Healing
5. Invisibility
6. Oil of Etherealness
7. Polymorph Self
8. Speed

9a. Sacrifice Preparation Chamber
This small camber off the hidden sacristy was the chamber where sacrifices were prepared. The remains of various tools of torture can be found hanging on the wall or in the dust on the floor. Channels are cut into the floor, which slopes toward the middle and an 8” diameter drain hole draining to area 14.

E10. Acolytes’ Cells
These tiny rooms were the cells of the acolytes and minor priests of the temple. The rooms all contain the rotted remains of beds and small tables. They are dust covered (though tiny, skittering footprints can be detected in some. Additionally, the rooms contain:
a. A human skeleton, a tattered scroll (light at 10th level) which is damaged so has a 50% chance of failure and 2 copper pieces.

b. A human skull, some broken toys, a cast iron symbol of darkness and a pack of rats.

Ordinary Rat (47): AC 7; MV 150’; HD ¼ ; hp 1 (x32) 2 (x15); THAC0 20; #AT 1; D 1; SZ S; Int Anim; AL N; XP 3(x32) 4(x15) (MM2)

c. Chicken bones, a sketch of Seven Stones Creek on a leather scroll and a piece of brimstone.

d. Broken glass, 2 vials of oil and a giant centipede.

Giant Centipede: AC 9; MV 120’; HD ¼; hp 2; THAC0 20; #AT 1; D -; SA Poison; SZ S; Int Non; AL N; XP 32 (MM)

e. A human skeleton, a brass cup, a loose stone in the Eastern Wall (treat as Secret Door) reveals a small book titled, Songs of the King.

If the book is opened, it summons an Invisible Stalker which will attack the bearer of the book unless the proper word is spoken (which can be found in the book, eventually). If the book is closed and set down or dropped, the stalker will disappear, only to reappear if the book is opened. Note, the spell on the book will always summon an invisible stalker unless the correct word is spoken, even if a stalker has been killed. The book is valuable to worshippers of the old gods (perhaps as much as 100 gp) but worthless otherwise.

f. This door was barricaded from the inside, but was broken through by brute force. The splintered remains of the door and several boards that had been nailed to the frame on the inside are scattered throughout. The floor is stained and a human skeleton in rusted and broken chain mail (without skull) lies in the middle of the room. A broken mace lies beside the body. On the left hand of the corpse is a ring set with a tiny ruby (about 50 gp).

g. Apart from the general rubble of rotted bed and table, and the dust and cobwebs of the ages, this room is empty.

h. A human skeleton.

E11. Common Room
This area was the common hall for the under priests and the acolytes. The room is covered in giant spider webs. The webs burn away easily. There are no spiders here (well, not any longer) but the party will find a couple skeletons (human, human, goblin) bound in silky strands. One of the corpses has an emerald ring (worth 100 gp) and another has a still usable sword. The southwest corner contains the privy. Most everything else that was in this room has rotted away.

E12. Kitchen/Dining hall
This room contains the rotted remains of tables and benches, crockery, a couple rusted cast iron skillets, broken and dented metal cups and pans, broken glass, animal bones, etc. In the Southwest corner is the fireplace where most of the food was cooked. In the area around the cookfire, indicated by a dashed line on the map, the floor appears to be covered in rusty metal rubble.

In fact, the floor is covered in Russet Mold (about a 10’x10’ patch) which will release spores in an invisible cloud as characters approach and, if the mold is touched, delivers 5-20 hp damage and victim must make save vs. poison or become infected with the mold and die in 2-5 rounds. Characters who die in this way rise again as Vegepygmies in 21-24 hours.

Russet Mold: AC 9; MV 0’; HD -; hp 13; THAC0 -; #AT -; D -; SA Spores (5-20 + poison); SD Immune to Wpns/Fire/Cold; SZ S~L; Int Non; AL N; XP - (MM2)

E13. Cook’s room
The cook of the temple was a crazy half-orc who dabbled in necromancy, much to the delight of the Old One (area 14). The walls of the cook’s room are scrawled with arcane symbols, pentagrams and the like. The cook has become a wraith.

WRAITH: AC 4; MV 120’/240’; HD 5+3; hp 31; THAC0 15; #AT 1; D 1-6; SA Energy Drain; SD +1 wpn or silver to-hit, Immune to Sleep/Charm/Hold/Cold; SZ M; Int Very; AL LE; XP 761. (MM)

Beneath the remains of the cook’s bed is a loose stone (treat as secret door) beneath which is the cook’s treasure: a cast iron symbol of darkness, 3 gp, a scroll (Slay Living – that is, the reverse of Raise Dead).

E14. The Black Pool
This cavern is filled with water. If the water is scooped up, it will be seen to be inky black in color. The water also has a slight acrid odor to it. The pool is 60’ deep here and the water rushes over the edge (to the northwest) in a small waterfall that leads down to the Cavern of the old One (E14a). The water is safe, but has a foul taste to it.

E14a. The Cavern of Old One
The eastern two-thirds of this cavern is covered in water, flowing down from the Black Pool above via a waterfall. The water, as above, is inky black and slightly acrid smelling.

The black water that falls from the upper cavern to this cavern drains out through an underwater crevice, somewhere in the murky depths. A shelf of rock rises out of the water on the western side of the cavern. Twenty feet above the shelf is a cave entrance.

E14b. Entrycave
This entry cave appears to be empty. Two small pools of water are on either side of the door. Very observant characters might note that the water is glassy smooth – nothing causes ripples, not vibrations or even the slight breeze that moves through this cave. The cave narrows toward the back. The ceiling is covered in crude paintings of winged creatures and what appear to be demons or gods. From front to back of the cave, the paintings tell a sort of simple story of these demons or gods coming to the winged creatures, the winged creatures bowing down, offering sacrifices, attending the demons or gods. Toward the back of the cave the paintings depict the demons or gods leaving and the winged creatures numbers begin to decline.

The paintings provide a distraction for the guardians of this cave to gain surprise. The cave is guarded by two Ooze Para Elementals. If the party is distracted by the paintings, the para elementals will gain surprise on the first attack. They will each sneak tendrils out to ensnare the closest victim (gain +2 on attack for surprise). If the para elemental hits, it has wrapped a tendril around the PC and will constrict for 2-16 points of damage per round until defeated. Once a PC is ensnared, the para elemental automatically does the constriction damage and will try to ensnare a second victim. There is no limit to the number of victims that can be held and constricted, though the para-elemental can only attack a single victim per round. Constricted victims may attack the para-elemental normally (though the DM may wish to impose some penalty as the victim's movement will be restricted).

Combat here does not attract any of the other denizens of the lair, though it will alert The Old One (if present) to the presence of intruders. The elementals have no treasure, only bits of bone and fragments of metal lie in the two small pits they laired in (the pools beside the entrance).

Ooze (Mud) Para-elemental (2): AC 3; MV 360’; MC: A; HD 8, 16; hp 44, 61; THAC0 12, 7; #AT 1; D 2-16; SA Constriction; SD +1 wpn to-hit; SZ L; Int Low; AL N; XP 3,510, 3,765 (MM2)

E14c. Corridor
The outer cave tapers into a corridor of sorts with a very uneven floor and walls that vary from 4' apart to 12' apart. The ceiling is 5' – 17' high.

E14d. Alcoves
These alcoves are the second guardposts for The Old One's lair: one black pudding clings to the (12') ceiling of each alcove, hoping for an intruder to search the alcoves and drop from above. If no one enters the alcoves, the Puddings will begin to pursue the party on the ceiling, hoping to drop down and surprise the party. They will wait until the party comes to the green slime pit if they are not noticed creeping along the ceiling.

Black Pudding (2): AC 10; MV 60’; HD 10; hp 48,67; THAC0 10; #AT 1; D 3-24; SA Dissolve wood/metal; SD Immunity to blows/cold/lightning/acid/poison; SZ S~L; Int Non; AL N; XP 2,022; 2,288. (MM)


E14e. Green Slime Pit
An iron vein runs through the rock here and a colony of green slime has been feeding on it for decades. This pit of green slime is 10' across, 12' deep and runs the entire width of this cave. If the party has not dealt with the Black Puddings in the alcoves above they will seek an opportunity to drop onto the PCs at this point.

GREEN SLIME (giant pool): AC 9, MV 0'; HD 10; hp 54; THAC0 16; #AT -; D -; SA Slime; SD Immunity to most magic; SZ S; Int Non; AL N; XP 718. (MM)

E14f. The Old One’s Slave
The old one has enslaved a Kelubar (Slime) Demodand. The squat humanoid creature is shackled by a collar and chained to the center of the ceiling. It has free range in this room, but cannot go beyond. Bones and fragments of metal litter the floor here.

The collar is magical. It prevents the demon from using any of its magical abilities (including gating in others of its kind). If the party does not attack immediately, the Demodand will beg for mercy claiming to want to repay its captor (which it calls the Slime Lord) for its captivity.

To remove the collar requires simply a dispel magic spell cast at the 10th level or greater. Doing so destroys the collar and the magic contained therein, of course.

If the party frees the Demodand, it will indeed seek out the Old One and attack, first gating in two more Kelubar Demodands with identical statistics.

Regardless of what the party does to aid or stop the Demodand, if they are successful against the Old One, they will turn on the party and attempt to kill them (they are chaotic and evil after all). The creature has no treasure.

Kelubar/Slime Demodand (1/3): AC -2; MV 120’/240’; HD 13; hp 76; THAC0 9; #AT 3; D 2-8/2-8/4-16; SA Detect Invisibility/Magic/Good, Dispel Magic, ESP, Fascinate, Fog Cloud, Tongues, Weakness (3/day), Gaseous Form, Invisibility, Ray of Enfeeblement (1/day) as MU13, Summon 1-2 Kelubar, Acid slime (4-24); SD +2 wpn to-hit, Immune to acid/poison/fear/illusions/phantasms, ½ dmg fire/cold; MR 26-37%; SZ M; Int Exc-Gen; AL CE; XP 5,327 each. (MM2)

E14g. The Old One’s Court
This chamber is where the Old One spends most of its time in a kind of stasis, though since the Temple of Darkness has been rediscovered, the Old One has been stirring. It longs for the days when sacrifices start pouring in again.

The roof of this cave has a 3’ diameter hole cut in it, beneath which is a huge brass laver, 12’ in diameter, on a cast iron stand. The hole in the roof branches out to the various sacrifice areas of the temple above, funneling the blood and remains of the sacrifices to the Old One here (ages ago).

Beneath the laver is a giant, amoeba-like creature, holding a deep, black sphere (or looking stunned with the bits of deep black stone protruding from various places – if the Stone has been destroyed).

Hundreds of years ago, the Old One discovered the Stone of Darkness and set itself up as the chief of the old gods. Through the use of this peculiar magic item, the Old One possessed the high priest of this temple and persuaded him to begin human sacrifices as well as the traditional animal sacrifices. The Old One received the blood and remains of sacrifices dumped down from the sanctuary and the secret chamber of sacrifice.

When the priests and others in the temple died, the Old One entered a deep sleep, awakened only by the arrival of Adam Shepherd. When Shepherd appeared, the Old One again projected its will as the Avatar of Darkness via the Stone of Darkness, hoping to re-awaken the worship of the old gods (and the sacrifices). If discovered, the Old One will seek to gate itself to a huge cavern underground and flee (with the Stone of Darkness if possible).

The Old One AC 1; MV 90’; HD 20; hp 111(79); THAC0 7; #AT 2; D 3-30/3-30; SA Nil; SD Immune to weakness, paralysis and charm, gate; MR 30%; SZ L; Int Avg; AL CE; XP 9,830. (NOTE: hp in parentheses are if the Stone of Darkness has been destroyed).

The Old One is attended by 2 Gelatinous Cubes, one on either side of the doorway, which will attack the first PC who enters the cave. The cubes have survived on mosses, slimes and molds for a long time in this cave and hunger for flesh.

GELATINOUS CUBE (2): AC 8, MV 60’; HD 4; hp 21,22; THAC0 15; #AT 1; D 2-8; SA Paralysis, Surprise on 1-3; SD Immune to cold/electricity/fear/hold/paralyzation/polymorph, sleep; SZ L; Int Non; AL N; XP 234, 238. (MM)

E15. The Inner Darkness
This room is covered in THICK DARKNESS. The air in this room is as thick as water and completely dark - as per continual darkness, 20th level, but the air thickens and slows movement rate by 50%, number of attacks are cut by half (i.e., every other round), countered by ring of free action and the like. Infravision functions at 25% range, Darkvision functions normally. PCs with a constitution of less than 12 will have difficulty breathing in this air (CON 9-12 unable to focus on anything but trying to breathe, CON <9,>F. Ending the Adventure

Killing the Avatar of Darkness and, thereby, destroying the Stone of Darkness ends the threat in the area. If the PCs reveal the existence of the temple to the villagers, worship of the old gods will slowly recur. This will bring the wrath of the Church of the True Path (in Jacob’s Well) as well as Arlin Farmoor, the local druid. PCs who can bring some evidence of the demise of the Avatar of Darkness (not just Adam Shepherd’s sudden recovery – perhaps one of the locals joined the expedition – or they bring back shards of the Stone of Darkness) will be rewarded by the villagers with 557 gp and free wares from any of the establishments (within reason). They will be hailed as heroes and stories of their saving Hope Cross will be told for years to come.

G. NPCs of Note


In addition to people who live in Hope Cross, the party may encounter a number of other personalities.

Shiralla, the Witch Woman. Shiralla is 280 years old, though she appears to be only in her mid 40s.
S 9, I 16, W12, D 9, Cn 10, Ch 17, Lvl 10 MU, hp 38, AC 9, THACO 16, AL CN. She carries a staff of Command which she uses to influence or intimidate people. The staff has 21 charges remaining, though she can recharge it.
Spells (those with an asterix are memorized when encountered)
Level 1 Affect Normal Fires, Charm Person*, Comprehend Languages, Dancing Lights, Detect Magic*, Enlarge, Friends*, Identify, Light, Mending, Message, Read Magic, Sleep*, Write
Level 2 Audible Glamer, Continual Light, Detect Evil*, ESP*, Forget, Knock, Locate Object, Scare*, Strength*, Wizard Lock
Level 3 Clairaudience*, Clairvoyance*, Dispel Magic, Feign Death, Gust of Wind, Haste, Hold Person*, Slow, Suggestion*, Tongues
Level 4 Confusion*, Fire Charm*, Hallucinatory Terrain, Massmorph, Minor Globe of Invulnerability*, Polymorph Self*, Polymorph Other, Remove Curse
Level 5 Contact Other Plane, Feeblemind*, Magic Jar, Passwall*, Stone Shape*, Teleport*
Level 6 Enchant an Item, Legend Lore, Globe of Invulnerability, Guards and Wards, Project Image, Reincarnation, Repulsion*
Shiralla will aid the party if they are respectful toward her and if they pay her fee. Generally, Shiralla will ask the party to do something for her (obtain a specific herb, bring the blood of a specific creature, take something somewhere) for she is not interested in money. The deed need not be completed before she gives the information to the party, but if they renege on their bargain with her, she will hunt them and haunt them. Use Shirall’s “fee” as a springboard for future adventures.

Shiralla is well respected (and generally feared) among the local townspeople. Her home is detailed elsewhere. She figures in many of the adventures in the Hope Cross/Jacob’s Well area.

Arlin Farmoor, Druid.
Late in life, after his wife died, Arlin (who hails from the Frontier lands) became the apprentice of another druid who, five months ago, was coming to tend the grove at Jacob’s Well. The pair were attacked on the way and Arlin’s master was killed. Arlin assumed his master’s role and took over care of the grove. No one has questioned him because of his age (he is nearly 60) and he wears his master’s cloak of elvenkind and carries his Staff of the Druid (see new magic items). He is only 2nd level, so he is quite unable to train another druid (and, if pressed by PC Druids who need training, he will make the excuse of being too busy).

S 11, I 11, W 16, D 9, Cn 15, Ch 15, Lvl 2 Druid, hp 9, AC 9, THACO 20, AL N. The Staff of the Druid has 13 charges left and Arlin cannot recharge it.
There is a 30% chance that Arlin will be in Hope Cross when the party is there. Arlin is the subject of another adventure (The Question of Balance) wherein the Druid Grove is more fully detailed. He is only a passing character in this adventure (if he appears at all).

Steffan Karian, Tinker
Steffan is a traveling tinker. He can fix almost anything mechanical, and many other things besides. He is a metalsmith, though of only fair ability. He is a Lvl 0 non-combatant but he is full of information on the region. He is secretly a spy for the Alliance of Free Lands (those who rebel against Imperial Rule) and would gladly join the party in their travels, though he is worthless in a fight. He has two special abilities, however, that may make him useful to the party (if he joins the party, he will work toward becoming a thief – though “officially” his class will be fighter): Outdoors he can Find the Path (as per 6th level cleric spell) 50% of the time if he is new to an area, 90% if he has been in an area before; he has a base 50% chance of knowing something on virtually any subject (per Legend Lore, 6th level MU spell).
S 12, I 14, W 11, D 17, Cn8, Ch 8, Lvl 0, hp 5, AC 9, THACO n/a, AL N.
Steffan is staying in a tent just east of Great Bridge. As he is a wandering tradesman, Steffan can be a fount of information on the surrounding areas.


Trapper Jorn Arintar
Trapper who lives alone in the Great Forest. He earns his keep by selling pelts (and meat) of small game, beavers typically, from the Seven Stones Creek area. He knows the Northwestern part of the forest very well (especially the creek area). He avoids the Pixies at Seeley’s Glen and the Dryad at here tree (though he helped her once and carries her charm). He is a gruff, but good man in his late 40s. Jorn is wary of strangers initially but once he is befriended he is fierce in his loyalty. He loves the people of Hope Cross (which he considers his home, even though he lives far from the village itself) and he was a good friend of the former druid. The new druid, Arlin Farmorr, he doesn’t trust yet (“There’s something about him I just don’t like.”). He wears his brown and grey hair and beard long and unkempt, he is always dressed in leather and fur.
S18, I16, W15, D11, Cn15, Ch10, Lvl R4, hp 27, THACO 18 ,AL NG.
Jorn carries a knife +1 (treat as dagger+1) and a short sword.

H. New Magic Items

Staff of the Druid
ExpV: 8,000 GpV: 30,000
This oaken staff is imbued with the following abilities, usable at will:
Animal friendship, locate animals, locate plants
The following abilities at one charge, once per day:
Purify Water, Charm Mammal, Animal Summoning I, Call Woodland Beings
The following abilities at 3 charges, once per day:
Animal Summoning II, Insect Plague, Pass Plant

Stone of Darkness
Minor Artifact
This 3’ sphere of inky, black basalt is highly magical, and highly evil. The Stone can be used to project the possessor’s will in the form of an Avatar of Darkness, up to 1000’. The possessor of the Stone can see and hear what the Avatar sees and hears via a magical connection, and the possessor of the Stone speaks through the stone to the mouth of the Avatar of Darkness. The magical nature of the Stone means that non-evil beings who even touch the Stone of Darkness are harmed by the magic. Good aligned creatures must save vs. poison or die; and if they do not die, they must save vs. magic or become permanently insane. Neutral creatures who touch the Stone must save vs. magic or become evil (50%) or become temporarily insane (50%) – an insanity that lasts 2 years. Evil creatures who touch the Stone must save vs. magic or become enthralled by the Stone (in essence, the Avatar of Darkness controls the creature through the Stone).

The possessor of the Stone of Darkness, in addition to the creation and manipulation of the Avatar of Darkness, can use the Stone to cast darkness 30’r 3/day, can cause fear by touch (at will),

If the Avatar of Darkness is “killed” the Stone of Darkness is destroyed (for 10-60 damage) and the possessor must make a save vs. magic or be under the effects of a feeblemind spell.

I. New Creatures

Avatar of Darkness
AC -1; MV 120’; HD 9; hp 9-72; THAC0 12; #AT 2; D 1-10+3/1-10+3; SA Spells, Possession; SD Darkvision 60’, summon shadows; MR 55%; SZ L; Int Avg; AL CE; XP 2,000+12/hp.

The Avatar of Darkness is the embodiment of evil elemental forces (see the Old One) created by the magics of an artifact known as the Stone of Darkness, not truly an embodiment of a god. The forces behind the Avatar of Darkness are ancient and evil and extremely intelligent, and through the Avatar of Darkness they are able to exert their will upon human victims. The Avatar, however, is really simply a puppet for deeper and darker elemental forces.

The Avatar of Darkness can summon 1-2 Shadows 1x per day (5% chance that the shadow summoned is a Shadow Demon). The creature can cast continual darkness at 20th level 1/turn at a 60’ radius and can cast the Thick Darkness spell 1/week. In addition, the creature can cause fear (as fear wand) 1/turn. The Avatar of Darkness extends his will out in a 300’ radius, drawing victims toward him requiring PCs to make a check (save vs. death magic) every round or begin moving in a straight line toward the Avatar.

The Avatar of Darkness takes on human form, though it can shapechange into nearly any form of solid darkness. When attacking it typically creates long, spike-like claws on the end of terrible fists that rake for 1-10 points of damage each (plus strength bonus).

The primary weakness of the Avatar of Darkness is light. If the darkness/thick darkness is dispelled around the creature, in normal light it attacks at -1 and its AC worsens by 1 (that is, AC 0). In magical light (light spell, etc), it attacks at -2 and its AC worsens by 2 (AC 1). In Holy Light of some kind (an item imbued with light from a god, for exmaple – cleric light spell is not, in and of itself, holy light) it attacks at -4 and its AC worsens by 3 (AC2). In Holy Light the Avatar of Darkness must make a morale check every round or cower in fear.


Possession – the Avatar of Darkness can attempt to infiltrate a human soul. The action takes one full round and the AoD must give its full concentration and effort. It is particularly vulnerable when attempting to possess someone (it’s lack of movement and concentration give the Avatar an effective AC of 4 during the round it is attempting to possess someone). If the Avatar takes damage during the round of an attempted possession, the possession fails and the enthrallment over that being is broken (at least for that round, though saves vs. death magic must continue). If a PC is successfully possessed by the AoD, he or she will become instantly Chaotic Evil and will fly into a berserk fury and attack the nearest creature (even their own comrades) - + 1 "to hit", +2 on damage, -3 on their own armor class. The rage will last for 7-12 rounds, and during this period, the possessed being will continually attack without reason or fear, moving on to attack other creatures nearest them if initial opponents are slain (language from scarab of enraging enemies). Possessed PCs will not attack logically but primally. That is, they will not use spells and magic items, but will attack with whatever weapon is at hand, bare hands if necessary, in a berserk fury.

The cure for possession is a Continual Light Spell followed by a Remove Curse (10th level or greater).

The Old One
AC 1; MV 90’; HD 20; hp 20-160; THAC0 7; #AT 2; D 3-30/3-30; SA Nil; SD Immune to weakness, paralysis and charm, gate; MR 30%; SZ L; Int Avg; AL CE; XP 6,500+30/hp.

The Old One is a primordial elemental being, one of the old gods. This creature resembles a huge, intelligent amoeba, able to form almost any shape out of its nearly transparent body. Eyes, legs, mouths, weapons, whatever is needed. The Old One will gate away to a safe place if threatened. It exists only to spread darkness and chaos, often at the direction of the greater elder gods. (NOTE: those with the original printing of Dieties and Demi-Gods will probably recognize The Old One as a modified Shoggoth). The Old One is not very intelligent, but it is clever and will use terrain, magic items and lackeys to its best advantage. If seriously threatened, the Old One can gate itself to safety elsewhere on the Prime Material Plane.

J. New Spells

Thick Darkness (Alteration)
Level: 6 Components: V, S
Range: 12"
Duration: 1 week Saving Throw: None
Area of Effect: 6" radius globe
Explanation/Description: This spell creates a 60’ diameter globe of continual darkness, with a twist. The air within this globe of darkness becomes thick and heavy, as if moving underwater. The thickened air slows movement rate by 50%, number of attacks are cut by half (i.e., every other round), countered by ring of free action and the like. Infravision functions at 25% range, Darkvision functions normally. PCs with a constitution of less than 12 will have difficulty breathing in this air (CON 9-12 unable to focus on anything but trying to breathe, CON <9, characters will fall to the floor gasping for breath – save vs. paralysis each round or suffocate – 3 consecutive failed saves and character dies).

Wednesday, March 11, 2009

Pillars of the Sky

Heh - didn't even make the Stuff I Want to Get Done post - but I was thinking about:

The Pillars of the Sky
The Spires of the Gods
The Fingers of the Earth

There are twelve spires of stone that reach up toward the sky across Daen-Ral. Each is linked to the others via powerful magics. Some are "dark" right now, the magic has failed in them. Crystalspur is one such dark spire. At least one (demonspire in the far south) crosses into a different dimension.

Other spires: Griffonspire, in the Great Forest (Cayleit Forest), Godspire, on an island somewhere. There's one in the far north, one or two on the Frontier in the east.

What are they? They offer powerful protection for the area (when Crystalspur failed, because of a huge magma dwelling creature, the Dwarvana were hit by a plague that wiped most of them out - the few remaining dwarvana clans became isolated and protectionist - but I'm getting ahead of myself). They offer means to transport quickly from one part of Daen-Ral to another. What no one on Daen-Ral knows is that they also connect to twelve identical spires on the continent of Baroth, the Old World where the mage wars still rage.

The Spires are powered by captive Firstborn/Firstfallen Exiles.

Stuff I Want to Get Done...

...sooner rather than later.

A Gazeteer of the Jacob's Well area. I have a couple rough maps and a bunch of notes - but writing out the notes in coherent form isn't a quick process. It's daunting, so I put it off and read Grognardia or Greyhawkgrognard or some other blogs (I love the name of one - A Rust Monster Ate My Sword). But I digress (see, I'm putting off that Gaz).

Do I write up a continental Gazeteer? There's a bunch of stuff that's unique to Daen-Ral that it might be worth it. I started it at one point, using the Greyhawk World Gazeteer as a guide. Monsters are different in Daen-Ral, the cosmology is different, elves and dwarves and all the usual tropes have a slightly different twist - and all that affects the stuff that I write. The gods are real, but they're not really gods isn't a new idea, per se - but it has to be communicated clearly. It may not really affect most of what I have. We'll see. Oh, and there are five elements, not just four. Not a biggie, but it matters (especially for the Coming Darkness series of adventures).

Do I just scan in the wild and bizzare notes from my expansion of B4 The Lost City or do I polish them up slightly and type them up? I mean, you get to meet Usimagaras and Madura and...whatshisname - and beat up on Zargon if you can. Hmmm... lemme think on that one.

Dragonhall is very minimal notes - but I want to polish it up enough to make it usable as is with minimal prep time (for me if I ever do) - but it's also part of the Coming Darkness series of adventures (below) so I'll need to make some modifications to it as it dives deeper underground and face the wraithlord.

Let's see... Adventures in the works:

  • Goblin House
  • Grave Robbers
  • The Curious Disappearance of Silian Jass (Ettercap Ambush)
  • Darkness at Hope Cross Part 1 Part 2 Part 3
  • A Question of Balance
  • Three Billygoats Gruff
  • The Silver Mine
  • Pilgrims
  • Attack on the Homestead
  • Slavers
  • To the Aid of a Heartache (the swamp adventure with dragon, druid and sorceress)
  • To the Aid of the Witchwoman
  • Tears of the Gods
  • The Dwarven Hammer
  • Shadow Stalker
  • Beneath the Wizard’s Tower
  • The Three Part Map
  • Quest for Primordial Fire (and Water, and Air, and Stone, and Darkness)
  • Servants of the Forgotten King
  • The Five Temples of the Elements
  • 1 The Mudpits of Krallan
  • 2 Palace of the Water Spirits
  • 3 Tomb of Air or Tomb of Aestharal
  • 4 Dragonhall
  • 5 The Pit of Souls
  • The Temple of the Elder Elemental Gods – with 5 NODES (yeah, kind of ToEE)
  • The Point of No Return

There are others, of course...

I really like the way that White Dwarf did their adventures that were included in the magazine - well, the several that I own, anyway. One, I believe it's The Star of Darkness, has a bit of wilderness, a couple of villages sketched out and a final multilevel dungeon with a BBEG. I like how the details of the villages and the wilderness were left kind of sketchy - the DM could prepare ahead or do it on the fly (which was what I always seemed to do). On the other hand, I like the Village of Homlett and Keep on the Borderland and Hackmaster's Little Keep on the Borderland because of the detail that the village/keep has to it. You know who lives where and what they do and, sometimes, why. I've tried to do the latter in Hope Cross, but the other tiny villages in the area of Jacob's Well are probably going to get the White Dwarf treatment - a couple major buildings, maybe an NPC or two, a note about how they might greet the party - maybe one or two hooks, if I come up with them. Jacob's Well itself will be pretty highly detailed, I think.

I have more areas around Hope Cross to detail - though I might eventually move the village notes themselves from Darkness at Hope Cross to the Gazeteer, not sure - but I have to detail Hag's Island soon - maybe incorporate that into Hope Cross or just into the Gaz - dunno. And maybe the Druid's Grove? Not sure even what should be there. Oh, and Damoric the Wizard's estate (and requisite dungeons beneath, of course).

I have to more carefully consider the monstrous population of the area. I know, for example, that goblin is wyvern's favorite food - so the goblin population is kept somewhat in check (well, that and the fact that they are MONSTERS - but that's for another time).

Exiles

Evil Elemental Gods

Cosmology

N'Daer

Darkness At Hope Cross Part Two

B. Trouble at Hope Cross

Adam Shepherd staggers into town and attacks Bridgemaster Sharn. When he has nearly killed the bridgemaster (and stripped him of his weapon), he turns on the next passerby, a caravan guard. Shepherd attacks clumsily with the short sword he took off of Sharn. The Caravan Guard, though surprised, easily avoids the attack, draws his own sword, and kills Shepherd, unless the party intervenes somehow.

All of Hope’s Cross is abuzz with the incident, no one ever expected anything like this from Adam Shepherd, one of the pillars of Hope Cross. The Constable requests the party to take over for Bridgemaster Sharn until he recovers from the injuries. Duty is pretty simple: When caravans come through they are to pay a copper per animal, two per wagon to cross the bridge. Local traffic and foot traffic is free. If the party is unwilling, the Constable finds someone else. No one bothers to report the incident to the Imperial Authorities in Jacob’s Well (it would be beneath their notice, anyway). However, the Constable wants to get to the bottom of this.

C. Possibilities:
  • The party intervenes and keeps the caravan guard from killing Shepherd. If they manage to restrain the shepherd, he will be completely irrational. He will mutter and sputter about “the darkness of my soul” and will move about often with his eyes closed (attacking wildly and randomly). He can be cured, either by casting continual light spell followed by a remove curse spell (at 10th or greater level) on the victim, or by destroying the avatar of darkness or the Stone of Darkness in the temple of darkness (see the appendices for details on the Avatar and the Stone). If he is not killed outright by the caravan guard, he will be taken away and chained (in the jail) and he will calm down. Later, he will escape and wreak havoc in the countryside, which will draw the attention of the Watchman and the Imperial troops from Jacob’s Well.
  • The party seeks to get Shepherd raised from the dead. This will work (the Curate or the High Priest at the Temple of the Path in Jacob’s Well are of sufficient level to accomplish the task), however Shepherd has been driven insane, so if he is raised he will immediately attack anyone around him.
  • The party attempts to speak with the dead. Again, this will be successful, though most of what he says will be gibberish – “the darkness is complete” and “the cave” and “lost in the darkness” come out fairly clear, though what they mean, no one seems to know.
  • The party investigates his home. See the key.
  • The party could consult with Shiralla, the Witchwoman who lives on Hag Island (Hag Island is detailed elsewhere, but Shiralla is an occasional visitor to Hope Cross – she happens to be in town to purchase some cloth and other supplies when Shepherd attacks Sharn). For a fee (see her writeup), she will tell the party that “The old gods are awakened. The avatar of darkness has been reborn.” She will tell them that Shepherd is under a wicked enchantment, though she has no details whatsoever – and that he is not responsible for his actions. Something or someone else is controlling his mind. What and where she cannot say, though if pressed will say South, but nothing more.
  • The party takes the Constable up on his offer of employment.
  • Resourceful parties will come up with something not on the list – so improvise. The goal is to get them to the Temple of Darkness, of course.

If the party has not found and dealt with the avatar of darkness, two days later a caravan will come straggling in, obviously having been attacked. When questioned, the guards will talk of a caravan guard who went off to relieve himself and came back two hours later and began to decimate the caravan, killing three guards, a drover and a young man who was traveling with them before the other guards could kill him. They can explain to the party where the attack took place (outdoor map D The Southdowns Encounter 13) and the general area/direction that the guard wandered off in. (NOTE if players are wandering aimlessly in the Southdowns, the DM could stage this event to give them some direction). If the party does nothing at all about the menace to Hope Cross, eventually the entire town will be either possessed or killed by a possessed citizen and the Watchman will be forced to send 50 troops into the village to kill every person and animal and burn the village to the ground (believing it to be a plague that is causing the madness). Eventually, the temple will be found and destroyed.

D. Hope Cross, The Southdowns & The Great Forest


D1. Hope Cross Village (see map)

The Southdowns

Whatever clues send the party to the Southdown (the wife’s comments, somehow interrogating Shepherd, the caravan guards, the witchwoman), the other shepherds are uneasy and reluctant to talk. When they are assured that Adam Shepherd is no longer a threat, they will talk a little.

They have no idea what happened. Adam Shepherd went searching after a prized sheep that had wandered away in the storm the night before (how it got out, no one is sure). He was gone most of the day and when he came back, he attacked the other shepherds, but the shepherds drove him off. They can tell the party the general direction that he went, and that he came back without the lost sheep.

D2. Shepherds’ common hut and common pen
This is a circular stone hut about 25’ across with a thatch roof. Surrounding the hut are low stone walls, radiating away from the hut like spokes of a huge wheel. Sheep fill 2 of the 8 pens thus created. Inside are three shepherds (two men and a boy).

D3. Shearing Shed
This is a small, open sided wooden shack with pen attached.

D4. Upper Pasture
Hundreds of sheep dot the fields here. A half dozen boys and men tend them as well as a number of dogs.

D5. Upper Water hole
A stone sided well with a bucket and winch for hauling up the water and two large wooden troughs for watering the sheep.

A thorough search of the area will turn up a couple sheep skulls and a broken leather sling.

D6. Cattle Pastures
Hundreds of cows wander these fields, surrounded by wooden fences. A thorough search of these fields will turn up nothing important, but will waste a lot of time.

D7. Lower Water Hole
This is a spring-fed pond and is the primary water source for the cattle in the area. At the bottom of the pond is a dagger +2 that was lost here by an adventurer decades ago.

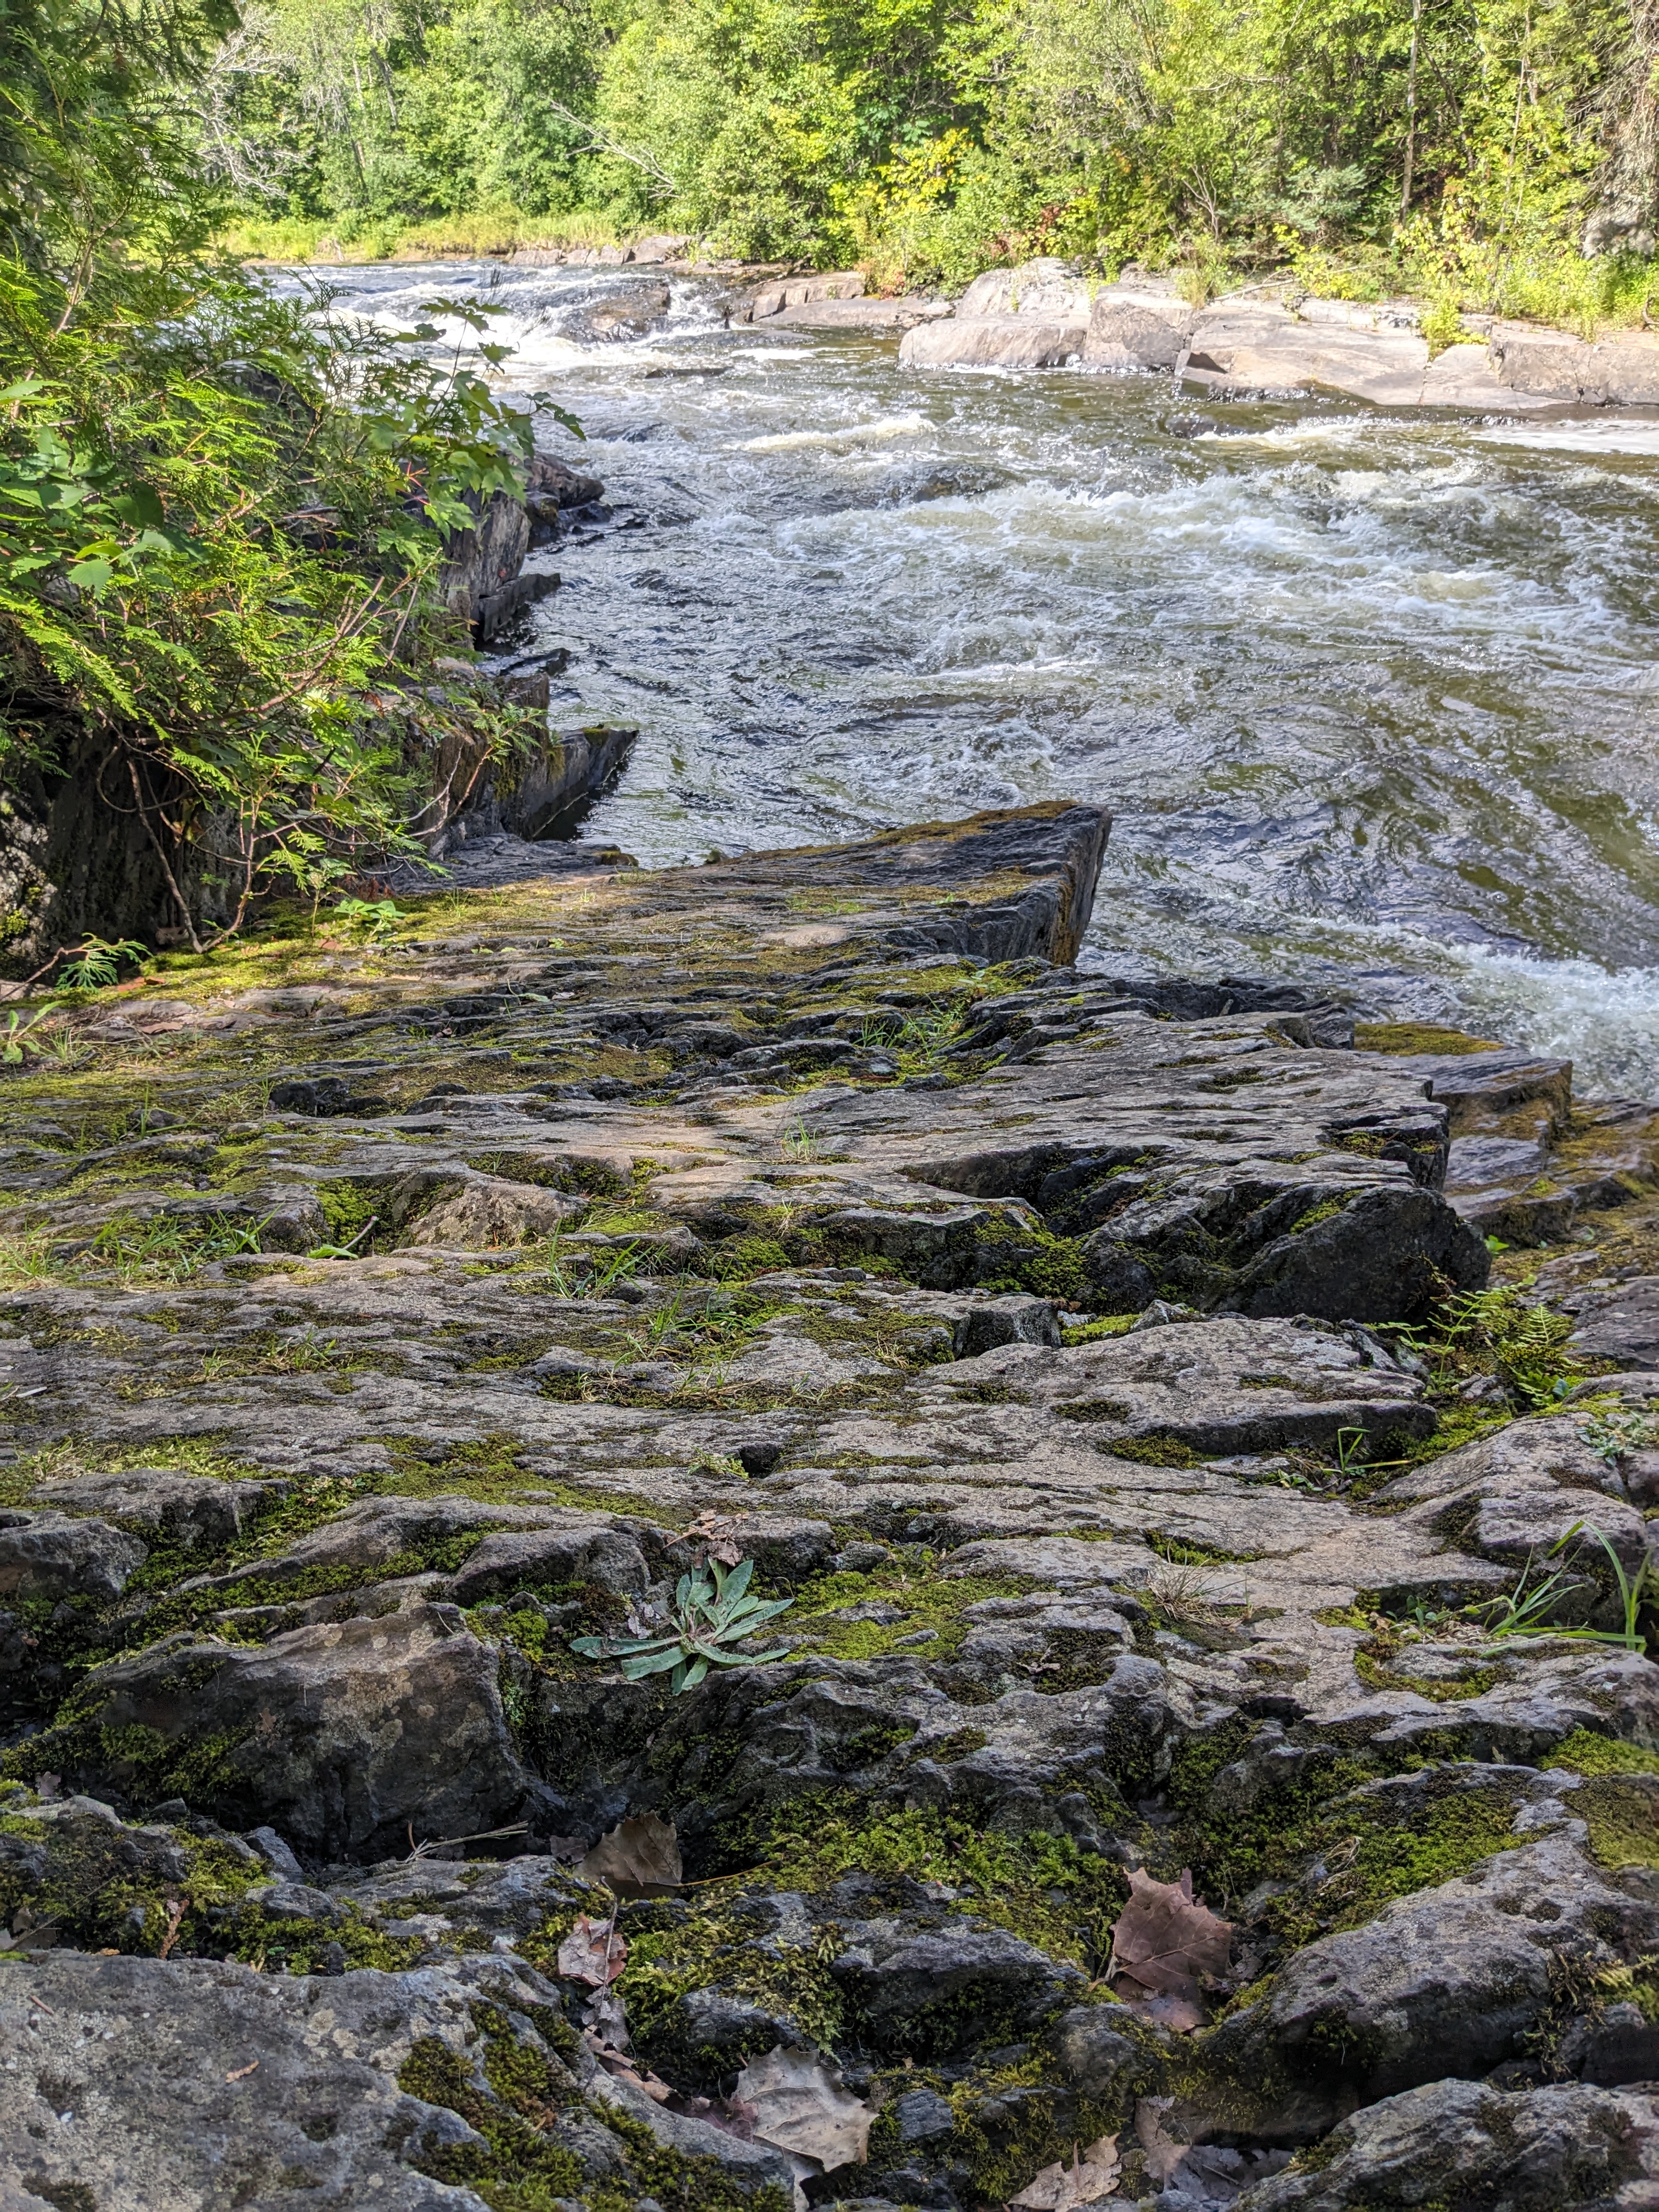
D8. Seven Stone Creek
The locals call this stream “Seven Stone Creek” because along the banks, at regular intervals, are seven large boulders. Each boulder has a name based on its shape (these are natural shapes, so, at best, they are impressions of the shape): Bear, Dragon, Skull, Duck, Twins, Tower, Great Face. Thus a villager might mention that the fishing is really good up at the Tower or that they saw several deer near the Bear.

Local legends speak of the seven stones being placed by some long forgotten god to mark the way to his home when he visited the valley. Others believe that elves long ago carved the shapes for magical rituals in the valley.

The truth is that the stones mark seven important sites to the worship of the old gods (which could be further expanded, especially if the people return to worship the old gods at the end of this adventure). The exact nature of these stones is left to the DM’s imagination.

D9. Boulder Field
This area is not frequented by the locals, who believe it to be haunted by a demon. The truth is that a reclusive Galeb Duhr lives in this boulder-strewn area and the creature has animated boulders on a few occasions to chase curious villagers away. If the party spends too much time in the area, or if they discover the Galeb Duhr, it will do everything it can to chase them off without killing them (though it might hurt them…). The creature has no treasure.

GALEB DUHR: AC -2; MV 60’; HD 9; hp 54; THAC0 12/10; #AT 2; D 3-18; SA Move Earth, Stone Shape, Passwall, Transmute Rock to Mud, Wall of Stone (1/rd), Animate boulders (60’); SD Immune to Lightning/Normal Fire; MR 20%; SZ L; Int Very; AL N; XP 2,648.

D10. Wyvern Spoor
One of the shepherds discovered the wyvern spoor here. They have battled the wyvern before, but the creature has not stolen a sheep for over two years now. The offal is clearly fresh, not having been washed away by the storm. Even though this is far from where the last sheep tracks were discovered, some of the shepherds are sure that the wyvern took Adam’s sheep. They will begin to arm themselves with long spears over the next week. The wyvern will not return. (Note – this is an adventure tie-in with the adventure “A Question of Balance”).

D11. Goblin Tracks
Clearly, some goblins visited the area after the storm. Goblins haven’t been much of a threat in the area, though the shepherds keep a close watch on the forest when the sheep are in the pasture. The goblins were sent to see if the storm had weakened the village enough for a goblin invasion. They returned to their lair with the news that the storm did very little damage to the village, so the goblins of the area will not attack. (Note – this is an adventure tie-in with “A Question of Balance”, “Goblin House” and “The Silver Mines”).

D12. Nixie Lair
Hag Island is detailed elsewhere, but this deep pool in the river here is home to 12 nixies with 3 giant pike. Shiralla has commanded these nixies to leave local people alone (occasionally they torment caravan guards or others who wander to this area unawares, but they do leave locals alone). Shiralla has made it known that those who drop coins or other trinkets into this pool will find good luck, so the locals often steal down to the bank of the river and toss in coppers or the occasional silver piece or other valuables. The muck and mud of the riverbed has 589 cp, 123 sp, 8 gp and various other small trinkets (value left to DM discretion) that have been missed by the Nixies.

Shiralla uses the Nixies as spies and guards for her island. The nixies live in an underwater cave system beneath Hag Island. A long tunnel leads from the caves to Shrialla’s home. If the Nixies are threatened or harmed, Shiralla will come to their aid. If the PCs cause the Nixies harm, Shiralla will only help them in the direst of need (if the entire area is threatened, for example). If the PCs come to the aid of the Nixies in some way, Shrialla will aid them for free in the future.

If the PCs come here at night, they will find Tesra, Farmer Arron’s wife, tossing a small statue into the water (see 16c in Hope Cross Village for more information on why she’s doing this).

The Nixies have the following treasure in their lair: 2344 cp, 1683 sp, 9 gems (4x10gp, 3x50 gp, 1x100 gp, 1x500 gp).

NIXIE (12): AC 7; MV 60’/120’; HD ½ ; hp 3 each; THAC0 20; #AT 1; D by wpn; SA Charm; MR 25%; SZ S; Int Very; AL N; XP 35 each.

PIKE, Giant(3): AC 5; MV 360’; HD 4; hp 11, 15, 21; THAC0 15; #AT 1; D 4-16; SA Surprise on 1-4; SZ L; Int Non; AL N; XP 71, 75, 81.

D13. Fallen Tree
This huge oak tree was very recently uprooted, probably the night of the storm. This is actually a Dryad tree, and as the great oak begins to die, so will the dryad. The dryad will attempt to use charm person on the male of the party who has the highest charisma. If the party can somehow rescue the tree for the dryad, she will release the charmed PC immediately and will aid the party in any way that she can. She has intimate knowledge of the forest within a 2 mile radius of her tree – so she can tell the party, for example, that “by the stream past the waterfall a stone has been shattered and the darkness has been released” – if they press her, she can give very detailed directions on how to get to the cave of the Temple of Darkness, but she knows nothing about what the darkness is, only that darkness has been released. She doesn’t know what that means, but she knows it is true. She can tell the party that a wyvern and some goblins have been in the area and that the wyvern ate one of the goblins before flying away to the north and that the remaining goblins fled east “to where many goblins live”. She will not reveal the presence of the Pixies and Faerie Dragons in Seeley’s Glen, though she is on good terms with them.

If the party helps her upright her tree, she will give them a charm (similar to a dreamcatcher) which will mark the bearer as a friend of the dryad and allow them to travel the forest unmolested by the normal inhabitants of the woods.

Hidden inside the tree is the Dryad’s treasure: 703 gp, (1) 50 gp Jasper and (1) 500 gp very deep blue Spinel.

DRYAD: AC 9; MV 120’; HD 2; hp 11; THAC0 16; #AT 1; D dagger; SA Charm; SD Dimension door into tree; MR 50%; SZ M; Int High; AL N; XP 138. (MM)

D14. Site of the Caravan Attack
Blood on the ground, a dented helm and some torn cloth are all that remain indicating that a fight took place here. This is where the caravan guard attacked his caravan after being possessed by the avatar of darkness (assuming two days has passed, see C. Possibilities.)

D15. Caravan Guard’s Scabbard
Dropped by the caravan guard after being possessed by the avatar of darkness. If the party makes a straight line from the caravan attack through this point they will find the Entrance to the Temple of Darkness.

D16. Seeley’s Glen
The forest thins here to a large open meadow and a small lake. This is the home of 14 pixies and 2 faerie dragons who will use all the magic and ingenuity at their disposal to agitate and annoy the party. The pixies have all three types of arrows at their disposal (d3 for type when hit). These creatures will not desire to truly hurt the party, but will delight in their frustration and confusion (which pixies and faerie dragons find hysterical – so the party will hear giggles and gales of laughter from around the glen, with no visible source). If the party can somehow convince the pixies that they have helped the dryad (encounter 11) or that they are attempting to stop the darkness from spreading, they will stop harassing the party and actually help them. Their help could include one of the faerie dragons accompanying the party, allowing the party to rest unmolested in the Glen to heal and recover spells, use of the Hammer +3 Dwarven Thower from their hoard (though they will expect it to be returned). They will be willing to barter items from their hoard, as well. The faerie dragons may also barter for items from their hoard, though take note that precious metals have no value to the faerie dragons. Gems and Jewels, however, are highly prized.

The pixie hoard is in the base of a willow tree near the lake’s edge and consists of: Hammer +3, Dwarven Thrower, 56 pp, (2) 100 gp amber, (12) 100 gp white pearsl, (1) 500 gp black pearl, (1) 2,000 gp opal, Potion of Speed, Druid Scroll (Shillelagh, Locate Plants, Produce Fire, Control Winds, Cure Critical Wounds, Transport Via Plants) MU Scroll (Ventriloquism, Bigby’s Interposing Hand, Antipathy/Sympathy, Bigby’s Clenched Fist, Mass Charm).

The Faerie Dragons’ hoard is in their lair which is a tiny island in the middle of the lake and consists of: (4) 10 gp Blue Quartz, (2) 10 gp Obsidian, (3) 10gp Moss Agate, (1) 10 gp Turquoise, (3) 50 gp Bloodstone, (2) 50 gp Moonstone, (1) 50 gp Sardonyx, (6) 100 gp Aquamarine, (4) 100 gp Coral, (7) 500 gp Violet Garnet, (5) 500 gp Peridot, (2) 500 gp Topaz, MU Scroll (Write), MU Scroll (Lightning Bolt, 8th level), Cleric Scroll (Insect Plague), Ring of Djinni Summoning, Rod of Absorption, Horseshoes of a Zephyr, Scale Mail +1, Sword, Cursed Berserking, Axe +1.

PIXIES (14): AC 5; MV 60’/120’; HD ½ ; hp 2 each; THAC0 20; #AT 1; D by wpn; SA +4 to-hit, Spell use; SD -4 to-hit; MR 25%; SZ S; Int Exceptional; AL N; XP 111. (MM)

Faerie Dragons (2), Green/Adult: AC 5(1); MV 60’/240’; MC: A; HD 4; hp 9, 10; THAC0 15; #AT 1; D 1-2; SA Euphoria Gas Cloud Breath Weapon + Spells; SZ S; Int High-Gen; AL CG; XP 316, 320. (MM2) MR 60%, MU10, D8

D17. Trapper Jorn’s Hovel
Jorn Arintar lives here. He makes his living trapping beaver and other small game in the vicinity of Seven Stone Creek. He knows about Seeley’s Glen and about the Dryad (though he does not know her tree has been uprooted). In fact, Jorn has a charm from the Dryad which he received for helping her with a troublesome Satyr some years ago. He knows the Seven Stone Creek area very well and would happily serve as a guide (and is willing to join as a retainer for 5 gp/day plus a 10% share in any treasure obtained – negotiable). See his NPC writeup for more information. Jorn’s hovel (40% chance he will be at home) is a small one room shack with a lean-to (smokehouse) on one side and a small shed (drying shed) in back. He has a root cellar and a cold spring house dug underground nearby and an outhouse about 100 paces away.

Inside the hovel are a bed, a chest (containing leather armor, 43 gp, two blankets, an ivory comb worth 10 gp and a silver pitcher and cup worth about 20 gp), some battered copper plates and cups, a cast iron frying pan, various pelts and skins, a number of animal bones (some carved).

D18. Entrance to the Temple of Darkness

Tuesday, March 10, 2009

Update

Updated Dragonhall below (added a few rooms)

Monday, March 9, 2009

Darkness at Hope Cross Part One

Well, here's an adventure that I've been working off and on for a while. Maps forthcoming.


Darkness at Hope Cross
The Coming Darkness

An AD&D Adventure set in the Jacob’s Well region

By William R. Beatty

Introduction
Darkness at Hope Cross is an adventure for 4-6 characters level 4-6 (about 18 total levels) of any class combination. It is intended to be the fourth adventure in the Coming Darkness series (Goblin House, Grave Robbers, The Curious Disappearance of Silian Jass), though it is not necessary to have played those adventures prior to this one. The Coming Darkness series takes place in the area of Jacob’s Well. The setting and major NPCs are detailed in the Jacob’s Well sourcebook. DMs who are using the Jacob’s Well sourcebook will find the wilderness considerably expanded with additional adventure opportunities.

Players who prefer “hack and slash” will find plenty of combat opportunities, but may find the people of Hope Cross spurning them if they are rude or violent in town. Allies and enemies can be easily made in this area. As always, the DM should thoroughly read the entire adventure before playing it, paying particular attention to the Avatar of Darkness, the Stone of Darkness and the Old One near the end of the adventure.


Adventure Summary
Last night, a violent thunderstorm tore through the valley, uprooting trees, swelling streams – the river nearly crested its banks (for the first time in 90 years). The storm shifted the ground under a great stone that was hiding the entrance to an ancient temple. It seems to be a temple to the old gods, but it is, in reality, a temple to the elder god of darkness.

During the storm, one of Alan Shepherd’s sheep ran away. In the morning, he began to search for it. Eventually, he could hear it crying inside the forest. When he made his way to the sheep, he found it trapped in a crevice, which turned out to be a cave. Inside the cave he found some clay pots with scrolls in them. Hoping that he had stumbled on some ancient wealth, he left his sheep and pushed his way into the darkness, fashioning a crude torch to light his way. He eventually found his way to the Sanctuary where the Avatar of Darkness (see new monsters) possessed him. Adam Shepherd’s mind was not sufficient to the task of thinking the thoughts of a god of darkness and he snapped, becoming homicidal.

The party must discover what possessed Adam Shepherd to attack people at random and determine a way to stop the Avatar of Darkness from possessing them and spreading chaos and darkness.

The adventure is divided into nine sections:

A. The village of Hope Cross
B. Trouble at Hope Cross
C. Possibilities
D. The Southdowns
E. The Temple of Darkness
F. Ending the Adventure
G. NPCs of Note
H. New Magic Items
I. New Creatures
New Spells


A. Hope Cross

The adventure begins in the hamlet of Hope Cross. Perhaps the party came to Hope Cross in one of the many caravans that pass through the area. Perhaps they came to visit Jacob’s Well for some reason, or to petition Damoric the Archmage for some reason. In the Heir Apparent campaign the PCs are from the area. Regardless, the action begins once they have settled in and have explored the town a bit.

Hope Cross is a hamlet in the shadow of Jacob’s Well, a prosperous trading town high on a plateau overlooking the valley (detailed elsewhere). While Jacob’s Well is listed on all of the official government documents as the town at the crossroads of the trade routes, Hope Cross truly sits at the crossroads. Caravans from all four compass points come through Hope Cross on their way to trade in distant lands. The Great Bridge of Hope Cross is a fairly famous landmark (at least in the eastern Midlands). So, though tiny, the hamlet is always busy with activity.

The village itself is the most prosperous of all the hamlets in the hundred of the Watchman of Jacob’s Well. While the merchants and traders who travel through the area will always travel “up the hill” to Jacob’s Well, caravan guards, drovers, travelers and others generally stay in the “poor town” of Hope Cross.


A1. The Great Bridge
This white stone bridge is 832’ long, 27’ wide and crosses the river 17’ above the surface of the water. It is an ancient artifact of an age before people moved into the area of Jacob’s Well. What civilization constructed it is not of a concern to the day to day life of the people of Hope Cross. The bridge is wide enough that two normal carts can pass one another while crossing.

A2. Steffan Karian, Tinker
Steffan is a traveling tinker. He can fix almost anything mechanical, and many other things besides. He is a metalsmith, though of only fair ability. He is a Lvl 0 non-combatant but he is full of information on the region. He is secretly a spy for the Alliance of Free Lands (those who rebel against Imperial Rule) and would gladly join the party in their travels, though he is worthless in a fight. He has two special abilities, however, that may make him useful to the party (if he joins the party, he will work toward becoming a thief – though “officially” his class will be fighter): Outdoors he can Find the Path (as per 6th level cleric spell) 50% of the time if he is new to an area, 90% if he has been in an area before; he has a base 50% chance of knowing something on virtually any subject (per Legend Lore, 6th level MU spell).
S 12, I 14, W 11, D 17, Cn8, Ch 8, Lvl 0, hp 5, AC 9, THACO n/a, AL N.
Steffan is staying in a tent just east of Great Bridge.

A3. Bridgemaster Sharn’s Hovel
This hovel is a two room shack – a front room with a table, three chairs, a fireplace and a small cupboard (containing some foodstuffs and a few utensils), and a rear room containing Sharn’s bed, a change of clothes, his shield, chainmail, a bearskin rug and 8 sp in a bag under his mattress.

Bridgemaster Sharn is a retired soldier. He is 60 years old, but still in good physical shape. He collects the tolls from caravans that cross the bridge. Weekly he turns in the strongbox to the Tax Assessor’s office. He carries a short sword and wears a (dirty and in need of repair) tabard embroidered with the Imperial Seal. He is amiable and enjoys conversation. He will be eager to hear news from “the world.” S 14, I10, W 9, D 8, Cn 16, Ch 11, Lvl 6 Ftr, hp 41, AC 8 (leather), THACO 16, AL N.

A4. Tax Assessor/Constable/Town Hall/Money Exchanger
This large, two story building is the official town center. The large central room is used by the villagers for their common meetings (about once a month) and whenever anything important happens. Off the central room are three other rooms – the Constable’s office and jail, the Tax Assessor’s office and the Money Exchanger.
A4a. Common Room
22 benches are stacked against the wall. There is a huge fireplace on the north wall. To the left is the Constable’s Office and to the Right the Tax Assessor’s and the Money Changer’s.

A4b. Constable’s Office
Constable Arten Waller lives with his wife in the three rooms above the office and jail (sitting room, bedroom, kitchen/dining room – 22 sp & 18 cp in a small locked box in the bedroom). He is a very stern but fair man.
S 13, I 10, W 16, D 9, Cn 11, Ch 12 Lvl 3 Ftr, hp 17, AC 8 (leather), THACO 17, AL LG

A4c. Tax Assessor’s Office.
Morten Sirall is the Tax Assessor. He collects the tolls from Sharn every week and assesses taxes quarterly on the villagers. He, in turn, turns in his books and the collections to the Reeve of Jacob’s Well. Morten is not a native of Hope Cross (in fact, he is Hamlish) and is hated in town. He is a non-combatant, normal man (though with a 17 Intelligence). Morten lives in a single room above the Assessor’s Office.

A4d. Money Exchanger
Byros Hill (an alias, but no one here knows him by any other name – he’s wanted in Hamlin for a crime he did not commit) retired from a life of adventuring to settle down at Hope Cross with his wife, Damalia. He is probably the wealthiest man in town, partly because he exchanges foreign (and ancient) coins for Imperial coins (at 15%). When in the office, Byros has two bodyguards with him (Mig and Firstal – lvl 4 Ftrs who have converted to the old faith and are more closely allied with Farmer Gil, Egran the Merchant and Jadan Tailor than their employer) and he is a proficient fighter/thief himself (lvl 4/6). Byros and Damalia live in four rooms above the Exchanger’s office with their 2 children. In the safe in the office Byros has 843 gp, 1294 sp, 1321 cp, 4 bars of gold and a several small gems. The bodyguards board with Farmer Gil (A16a). Byros is a genial, but superficial, man.

A5. Hope Cross Inn
Hope Cross Inn is run by Terrance D’Andral, a man who moved from the far west to the area 35 years ago. He had been a merchant, a mercenary and even a traveling performer. Hope Cross became his home when his left leg was shattered in a riding accident and traveling became terribly painful. He walks with a pronounced limp. Terrance is extremely friendly and very generous. He lives alone in a room in the back of the Inn. He keeps a lockbox in his room, under his bed, with 52 gp, 112 sp, 99 cp). He hires women to work the kitchen and clean the rooms (farmer’s daughters, mostly). The rooms at Hope Cross Inn are safe and clean.

A6. Gire’s Tavern
Gire’s Tavern is a hole in the wall. Gire, his wife Sella and their 3 daughters run the place – half bar, half brothel. Drinks are cheap and watered down, the atmosphere is smoky, food is suspect. Still, Gire’s is the place that the farmers, herdsmen and fishermen congregate and on most nights the main room is full. In a bag under his mattress Gire has 3 gp, 23 sp and a small sapphire (worth 22gp).

A7. “Lady” Prisa’s Taven
Prisa is no lady, though she has claimed the title for her tavern. The atmosphere at Lady Prisa’s (or “the Lady” as locals call it) is a little more refined than Gire’s. Prisa employs a dozen girls, half of whom will be on duty in the main room and in the kitchen at any given time. She also employs three bodyguards (F3, F4, F4 hp12, 15, 19 clubs). Occasionally, someone will come “off the hill” for business of some sort, most of them end up here. Prisa, it is rumored, is a lover of the Watchman. There are 10 bedrooms on the second floor, a large common room, a private dining room, the kitchen and Prisa’s room on the first floor. The body guards live in a farmer’s hovel (A16b), four of the girls stay in one of the bedrooms, the others are local girls who go home to their parents when not working. In her bedroom, under the bed, is a lockbox containing 112 gp and 159 sp.

A8. Egran’s Dry Goods
Egran is the local supplier. Since caravans come through town frequently, all normal items are available at Egran’s at normal prices. However, the items are of only average to poor quality, with a 10-20% chance of failure on any given item when put to use. Items of vastly superior quality are available at Jacob’s Well, but the cost is significantly higher. Virtually any normal item is available at Egran’s, and there is a 20% chance that some unusual items are lurking in the store as well. Egran is a very extroverted and amiable man. He is a worshipper of the old gods and is quietly evangelizing (with Jadon Taylor [A13], Farmer Gil [A16a] and Bryos Hill’s bodyguards Mig and Firstall [A16a and A4d] In a strongbox in the back room (Egran’s bedroom) is 32 gp and 111 sp.

A9. Hooper’s Saddles and Leatherwork
If the party needs any kind of leather work done, Hooper is very skilled. Leather items purchased from him will cost 10% more than the DMG lists, but will be of vastly superior quality and will withstand 20% greater use/abuse than standard items (that is to say, they gain a +4 on item saves). Stimmel ships all his hides to the tanneries in the south, so Hooper buys his from the other herdsmen in the area. Hooper is a gruff man, and difficult to please. He criticizes nearly everything. Locked in his desk is 12 gp and 22 sp.

A10. Hope Cross Stable, Wainwright and Horse Dealer
Elmoran is the local stablemaster. He owns 8 good horses which he keeps in the rather sizable stable on the town square. His stock changes frequently as he trades with the caravans that come through town, the occasional Imperial messenger who wants to change horses and ride on, and he makes a monthly trip to Suduran’s Outpost to the south, where fine horses can always be found (see…….) Elmoran will sell a horse for DMG prices +20% (he can be negotiated down to DMG +5%) and will board a horse for 1 sp/day. 3 Stableboys live in the loft above the stable (local orphans – ages 9,8&6). The Stablemaster has 3 wagons available for rent and is the only man in the area who can repair a broken wagon wheel or axle. He lives in an attached shed with his wife and three daughters (one of whom works for Lady Prisa, the others are too young). In a small safe in his home Elmoran has 22gp, 91sp, 87 cp. He owns a sword, which is kept above the fireplace. He accepted it in trade for some services. He doesn’t know it, but it is a sword +2.


A11. Chapel of the Sun
This small shrine is to the chief god of the area (god of light, sun, good, etc.). The priest is a young and inexperienced man (his clerical levels were gained cloistered in a monastery) who is questioning his faith. He is dutiful with services, but he rarely proselytizes any more, even the occasional adventurer who shows up in the chapel seeking healing or a curse removed. As his powers are fairly limited, he generally sends such petitioners to Arlin, the druid in the Grove, or to the high priest at the Church of the Path in nearby Jacob’s Well. He is a 4th Level Cleric (S14, I13, W18, D15, C12, Ch11, hp 13)

Spells:
Level 1: Bless, Purify Food and Drink, Sanctuary
Level 2: Augury, Chant

A12. Baker/Midwife
Dellan is the local baker and his wife, Terra, is the local midwife. Terra is a dark eyed and dark skinned woman from the far south. Even though she has helped nearly every shepherd in the area at one time or another, some of the local men think she’s a witch. However, since most of their wives have trusted Terra with their lives (and with their children’s lives), those men usually speak about it in hushed tones. Terra is the closest thing the village has to a doctor (under her care hit points are regained at the rate of 2/day)

A13. Weaver/Tailor
Jadan Tailor – local cloth weaver and tailor. Jadan is a quiet and sullen man who keeps to himself. He never married. He is trying to revive faith in the old gods, but is doing so very quietly. He has found others who are trying to revive “the old faith” – Egran (8 above) the Merchant and Farmer Gil (A16 a) and Byros Hill’s bodyguards (A16a and A4d).

A14. “Lord” Stimmel, Cowherd/Butcher
Stimmel is the largest cattle owner in the village. He was once in the employ of the Constable of Jacob’s Well and remains on friendly terms with his former employer, so the locals call Stimmel, Lord Stimmel. Stimmel owns over 1000 cattle that he pastures in fields to the north of Hope Cross. He is the local butcher and ships a fair amount of meat to Jacob’s Well and some of the other villages in the area. He ships the hides to tanneries in the south, which has become a very profitable business for Stimmel. His home is the largest in Hope Cross and in his bedroom he has a strongbox with 200gp, 1200sp, 800cp. He employs four body guards (F3, F4, F7 [Str 18] hp 11, 17, 31 – chain, shortsword, shortbow, shield) who live in the basement of his home.

A15. The Market
This is the open air market for the village and the surrounding farms. The fourth day of every week this area is abuzz with stalls filled with animals, handcrafts, metalwork, vegetables, and the like.

A16. 5 Farmers’ Hovels
a. Farmer Gil (and Mig and Firstall, Byros Hill’s bodyguards – see A4d) All three men are members of the old faith, with Jadan Tailor (A13) and Egran the Merchant (A8).
b. Prisa’s bodyguards (see A6)
c. Arron (wife Tesra, son Milos, son Edros, daughter Dellah, daughter Mila) Tesra is terrified by what has happened to Adam Shepherd and she believes the gods have turned their backs on the people. She has heard whisperings that there are some who wish to return to “the old faith”. One night she will take the small statue of her family’s god down to the river where the Nixies lair and drop it into the river. The next day, Arron will panic and believe that his house has been broken into and the statue stolen (it is bronze, but it has some gold layered on the face and hair – value is 40gp). Tesra will be too afraid to tell Arron what she has done. If the statue isn’t found, Tesra will eventually seek out others who wish to convert to the old faith and leave her husband. She will seek out the Temple of Darkness and, if the PCs have not stopped the Avatar of Darkness yet, be possessed by the Avatar and begin a killing spree.
d. Jarron (widower, son Hale, son Daman)
e. Kylan (unmarried)

A17. Herdsmans’ Hovels
These are little more than shacks. Each has a small garden behind, some well tended, others not so, and many have a small lean-to attached to the side housing tools, chickens, etc.
a. Adam Shepherd’s hovel.
Adam lives here with his wife (Danla) and infant son (Myles). Shepherd’s wife is deathly ill with a fever. Myles hasn’t eaten in over a day and is likely crying when the party arrives. The fever is causing Danla to hallucinate about “the gray death” and “the night birds of Tonovan.” These are red herrings – the fever is real, but unrelated to Adam Shepherd’s current state. The gray death is a plague that took most of Danla’s family when she was very young and “The Night Birds of Tonovan” is a children’s story that her mother used to tell her. If Danla goes untreated for more than three days total, she will die (at the time of Adam’s appearance at the beginning of this adventure it has been about 18 hours since she contracted the fever – so from that point she has about two and a quarter days to live). If Myles isn’t fed within the next 24 hours, he will die.

If the party gets Danla back to health (cure disease, remove disease, heal or the ministrations of either Shiralla or Terra, or the like), she can tell the party that Adam had come home to bring a small gold coin that he had found in the field and spent the night at home when the terrible storm swept through the region. Very early the next morning, one of the young shepherds ran up to tell him that his best ewe had wandered off and that they’d found fresh goblin tracks in the area and wyvern spoor. He hurried off immediately to find the sheep. They pasture their sheep in the common fields in the Southdowns.
b. Damran (wife Seva, daughter Mika, daughter Tila, daughter Mina, son Dael)
c. Tevan (wife Missa, son Gile, son Barran, son Arron, son Damron, daughter Tilla)
d. Baen (wife Lana, son Kylan – 16 e above – son Manal, daughter Tessa)
e. Doen (widower, no children)
f. Bassal (wife Tila, no children)
g. Angal (wife Denna, son Gil, son Donal, son Philos)
h. Garan (widower, son Adam, son Tristal, daughter Misa)


A18. Fisherman’s Hovels
a. There are only two men who earn their keep fishing in Hope Cross. They are brothers, and frequently work together.
b. Garrat (with wife, Dian and son Tilor)
c. Raman (with wife, Solas)

A19. Argus Hunter
Argus is a retired huntsman. He still frequents the forest and is very good friends with Trapper Jorn Arintar. In his 80s, he’s not as fast or strong as he once was, but he knows the forest better than anyone. If asked, he will lead the party to the Southdowns and will be able to quickly track Alan Shepherd’s movements to the Temple. He is not much of a combatant (F4, S10, I12, W16, D14, Cn12, Ch10 hp22) but he is a crack shot with a longbow (he gains a +4 when attacking with a bow) and he has 6 arrows +2 as well as 4 silver tipped arrows and 22 standard arrows. He will not accompany the party into the Temple.

A20. Caravan Fields
These wide open fields are reserved for the frequent caravans that pass through Hope Cross. (See the encounter tables – there is a 35% chance per day that a caravan will camp here for 0-3 days – note what can happen if three caravans are here at the same time).

A21. The Mill
The grain from the local fields is ground to flour here. Danaras is the Millwright and is the second wealthiest man in town. The mill is a small walled compound with the Mill buildings, Danaras’ large house and several silos and barns. When goblins threatened the area a dozen years ago, the townspeople took shelter in Danaras’ compound and they managed to hold off the goblins until the militia from Jacob’s Well arrived. Consequently, Danaras is a bit of a local hero (he even adventured briefly twenty years ago – F5 S17, I13, W16, D15, C17, Ch15 hp 27 has chain +2, shortsword +1, longsword, longbow and arrows that he put to good use during the incursion.) Danaras is a very likeable man, generous and talkative. He does guard a secret (he murdered a man when he was very young and his generosity is probably a form of penance).

Sunday, March 8, 2009

Cube of Wonder

Well, I've been mulling over this little bit of insanity for sometime - dunno if it's a good idea or just a thought experiment, but...here goes...

All the talk of castles and dungeons of mad archmages has made me wonder...if an archmage really were mad, what kind of magic item might he create? And then my daughter handed me a Rubik's cube to solve...and I started putting things together, so to speak. Yeah, if you hate random tables, you'll despise this thing...

So - here's the:

Cube of Wonder

A minor artifact created by the Mad Archmage to confound intruders in his dungeons. The cube is made up of smaller cubes, nine on a side, each of the six sides having a different color (that is - nine cubes each of red, blue, green, white, orange, and yellow). Each of the smaller cubes, except the center colored cube on each face, rotates around the cube. When found, the cube will be randomized.

To use the artifact, one makes a randomly determined number of "moves" on the cube and then tosses the cube like a giant die. The cube must rotate at least four times in the toss. Effects are determined randomly, based on the number of correct colored cubes on the side that is upward facing.

When player declares she/he will cast the cube, magics are set in motion so that he/she must accomplish the task within 1 hour or the cube will vanish in a magical explosion (for 2d20 points of damage to all within 10' - the cube itself does not explode but is catapulted to a random location within the Mad Archmage's dungeon by the magical explosion).

When the character determines to cast the cube, the cube "randomizes" itself for 5-20 (5d4) random moves. The character then is able to make 1-20 (1d20) moves of the cube. The player MUST make the randomly generated number of moves, no fewer. Once the moves are accomplished, the cube locks and must be cast within one hour or vanish in an explosion (doing 2d20 points damage to anyone within 10'). Once the cube is cast, and the effect is determined, the cube randomizes itself again - 6-36 turns (6d6) and locks until someone declares they will cast it again, and the process starts all over again. Note that means that if a PC decides to cast it, it will randomize for 5-20 moves, the PC will move it 1-20 times, cast it, it will randomize again for 6-36 moves and then if the PC decides to cast it again the next round it starts over with the cube randomizing itself for 5-20 moves...etc.

When the cube has been cast, look at the side that is laying on the ground/floor - count the "correct" number of colored cubes on that side. If the number is odd, read the left collumn of the following chart. If the number is even, read the right collumn of the following chart for the number of "correct" colors on the upward facing side:

Red


1 9


2 8


3 7


4 6


5 5


6 4


7 3


8 2


9 1


Blue


1 9


2 8


3 7


4 6


5 5


6 4


7 3


8 2


9 1


Green


1 9


2 8


3 7


4 6


5 5


6 4


7 3


8 2


9 1


White


1 9


2 8


3 7


4 6


5 5


6 4


7 3


8 2


9 1


Orange


1 9


2 8


3 7


4 6


5 5


6 4


7 3


8 2


9 1


Yellow


1 9


2 8


3 7


4 6


5 5


6 4


7 3


8 2


9 1


Specific combinations of colors seem to have an effect as well.


Both opposties: if the upward facing side and the downward facing side have only each other's colors (that is, none of the "side" colors) then the effect conjured is double that of both sides.


If the upward facing side has five cubes of the same color in an X shape (that is, the four corners and the center), then the effect generated is triple.


Cubes with other color combinations have been found but work on the same principle. In addition, there are rare versions with 4, 16 or 25 cubes on a side - these (especially the larger versions) are dastardly indeed and are best explored with the utmost care.